Showing posts with label craft. Show all posts

Sunday, 1 September 2013

A Felt Butterfly Mobile

About a fortnight ago I discovered that a friend from church has breast cancer. She underwent a mastectomy a couple of days ago.

When I first heard the news, I started to think of what I could make as a gesture of encouragement and support for her. She's an incredibly talented and creative person, which I found a little intimidating, but also made me think she would appreciate something a little outside the square.

Carolin loves butterflies, so I started with that. My plans changed several times, but gradually evolved into a felt butterfly mobile. Here is the finished product:


The completed felt butterfly mobile.

I based my mobile loosely on the one found on the Bugs and Fishes blog here. The first thing I had found in the supermarket was a notebook, so I chose felt colours based on that.

The notebook featuring a butterfly print.

I copied the butterfly template from the tutorial, and cut out 15 felt butterflies (three in each colour).  Then I threaded them in strings of two, three or four butterflies, with some little beads down the centre of each butterfly. I just used two strands of embroidery thread, as I couldn't find any fishing line at home. I was pretty pleased when I worked out a system for ensuring they were all the same distance apart, and stitched so they couldn't slide down.


The strings of butterflies ready to be hung.

Next I used a black pen to write the reference to a Bible promise on each butterfly. I tried to choose 15 texts that would be inspiring in the circumstances. In the notebook, I wrote out each text in full.


A butterfly with a text written on it.

I found the inside ring of an old embroidery hoop and tied the strings of butterflies at equal distances around it. Then I did my best to tie three strands of thread to a keyring above the hoop so the mobile could be hung easily. It was a little crooked, but not too bad!

Carolin posted a photo on Facebook after I gave the mobile to her, so here is a shot of it in it's new location in her home:

It is very satisfying to make something someone enjoys using!

As is often the case, now I've done this for someone else, I thought we could probably use one at home too. But it will have to wait awhile - my list of gifts to make is pretty long!

Monday, 29 July 2013

Felt Bird Keyring

It was my friend Nevila's birthday yesterday.

I had been looking forward to attending the Craft & Quilt Fair, but ended up staying home due to a lack of finances. So I thought - instead of looking at crafts, why not make something?

This felt bird keyring was a kit from a Mollie Makes magazine I purchased recently (a fantastic magazine, if you're not familiar with it). All I needed was some Bondaweb and stuffing. The instructions were simple, and I was really pleased with how it turned out.


I customised the keyring by sewing a felt patch on the back. On the patch, I embroidered "Math. 6:26", a reference to the words of Jesus:

"Look at the birds of the air; they do not sow or reap or store away in barns, and yet your heavenly Father feeds them. Are you not much more valuable than they?"


I got myself a little bit confused by embroidering straight onto the patch without writing the text out first. So it looks a little primitive, and "Matt." turned into "Math." by mistake. Still, it's the thought that counts, right?

I wrapped some fresh pumpkin scones (still warm from the oven) in a blue tea towel with white polka dots, added the keyring and a card, and Grace and I dropped off the package in the afternoon.

Another handmade gift done. I'm not sure how great it is for the recipient, but I find the process very satisfying and rewarding.

(A quick word of apology to those friends and family who are yet to receive a gift from me this year. My efforts are a little patchy. But I haven't forgotten you!)

Saturday, 16 February 2013

A Pair of Personalised Baby Bibs

A friend of mine gave birth to twin boys on Wednesday.

We're going to visit them in the hospital tomorrow.

They were born at around 37 weeks, and were good weights at birth. I'm sure they will thrive - although things might be a bit tough for their parents over the next few months! The couple already have two sons, aged five and three-and-a-half.

I purchased the twins a CD of worship songs and lullabies, and decided to make them each a personalised bib. While I didn't know their gender, I obviously knew they were expected, and had purchased the bibs already. I was just waiting for more details before getting out my cross stitch books.

A pair of matching personalised bibs for the twins.

It is cheating a little bit to purchase rather than sew the bibs, but given how far behind I am with my gifts for all the people with birthdays in February, I thought the compromise was justified!

I have quite a few books of cross stitch designs, alphabets and borders. I ended up drawing up my own design, based on a train in one book and an alphabet in another. I think it came together OK.

A train for Noah ...

... and a train for Aaron.

Having faced not being able to cross stitch again after thumb reconstructions a few years ago, it was lovely to find that I can still do it - and pain free, too! The only problem was, I'd forgotten how long it takes!

I hope my friend will appreciate a gift that is fairly basic and simple, but personal and made with love.

Wednesday, 13 February 2013

A Valentine's Day Gift

Tonight I made a simple little gift for Valentine's Day.

Another idea gleaned from Pinterest, I added an appliqued heart after I couldn't find any fabric with hearts on. I think I like this version better anyway!

A framed 'Love You' with appliqued heart.

Here's how to do it:

  1. Take the glass out of a photo frame (I had a spare one in the cupboard).
  2. Cut a piece of cardboard to fit inside the frame.
  3. Cut a piece of fabric about 2cm larger than the cardboard, then iron it.
  4. Iron some double-sided interfacing onto a small piece of red fabric.
  5. Draw a heart shape on the interfacing paper, then cut it out.
  6. Lay everything out to determine where to place the heart. 
  7. Remove the backing paper and iron the heart into position.
  8. Use a contrasting thread to stitch around the heart.
  9. Attach the backing fabric to the cardboard, using tape or a hot glue gun.
  10. Place the fabric-covered cardboard inside the frame, and secure the back.
  11. Use a hot glue gun to glue the letters in place.

A close up view.

What made this gift extra special to me was the fact that the Scrabble pieces are left over from our wedding.

When planning our reception, I had the idea of spelling each person's name in Scrabble letters instead of using place cards. Neil's mother and my family all enjoyed playing Scrabble, and I thought it might give people something to play with if they got bored during the speeches!

I bought a couple of bags of mixed Scrabble pieces from Ebay, and my very clever father made little stands to put them on. The hard part was working out exactly how many of each letter I needed! 

One of the place settings at the wedding (before the flowers were placed on the candelabras).

A message made for us by a table of wedding guests.

It's nice to have this connection between our wedding and my Valentine's Day gift for Neil. And it's nice to actually look back at the details of our day, which can easily be lost in the rush of everyday life.

In a brief speech at our wedding, I spoke of the fact that the name 'Neil' means "champion". Back then, I only knew a man who had captured my heart, and the dreams that we shared for the future.

Now I know a man who isn't perfect, but is still great to have around. I know a man who is a loving and involved father to my children, and who helps, supports and encourages me. I know the hardships we have been through together, the good times we have shared, and the dreams we still hold for the future.

Neil, you will always be my champion. And I'll love you forever.

Tuesday, 1 January 2013

A Rag Doll - Part 1

I was going through my craft box the other night, and came across a calico doll I made. It must have been while I was in university - nearly 20 years ago!

This particular UFO (unfinished object) must be one of the oldest in my collection, and has travelled Australia with me. I thought it was high time I got it finished!

The calico doll's body.

The first thing I did was embroider the facial features (and I admit, I un-picked and re-did them a couple of times before I was happy).

The completed doll's face.

Next was the hair, which I had no idea how to do before coming across a tutorial on the Quaint and Quirky blog (found here). The instructions were really clear, and I didn't have too much trouble (except with the wool, which Grace had 'rearranged' for me earlier in the year).

Never leave a 2-year-old alone with two balls of wool!

My only tip would be to check the size of your doll's head. Because I already had a body, and didn't use the tutorial pattern, the hair was a little bit shorter than I would have liked.

This is what the doll looks like now:

Isn't she cute?

The hair is in a short bob, because it was only this long at the front.

I don't think I could be a hairdresser!

Next I'll make the clothes. Grace has reminded me a few times already.

"Mummy, the dolly is cold!"

New Year's Resolutions 2013

Yep, it's that time of year again.

Time to look back on how things went over the last 12 months.

And time to look forward and set goals for the year ahead.

In my New Year's Resolutions post at the start of 2012 (found here), I set out to do four things:

  • Respect my body.
  • Improve my parenting skills.
  • Spend more time with my husband.
  • Spend more time with God.

I made a little bit of progress. I read quite a lot of 'Toddler Taming', and went on about four date nights with Neil. I kept good health during my pregnancy (it has fallen away a bit since then), and read the odd devotional. But I haven't really got there with any of them yet.

Not that it is clear where 'there' is!

These areas of life will always require attention. They're not goals I can cross off as done.

However, in 2013, I'd like to frame things slightly differently. Once again I'm focusing on broad principles. But I'll try to break it down into specific and achievable goals.

I'd like to make 2013 the year I Nurture The Relationships In My Life.

Specifically, I'd like to focus on my relationships with God, myself, Neil, my children, my family, my friends, my church, and others.

In measurable terms, I will:

  • Make the gifts I give to my family and friends. I'm already full of ideas. Just expect that your present might be a little bit late to arrive - especially if you're one of the seven people with birthdays in February!
  • Go on one date night a month with Neil.
  • Invite someone to our home for a meal each month. No matter what the house looks like.
  • Go on a family weekend away quarterly.
  • Spend some quiet time alone in prayer every day. Even if it is in the middle of the night.
  • Look into starting a small Bible study group with other parents of small children. Maybe mums one week, and dads the alternate week?
  • Find a way to convince myself I am 'good enough'.

I'm not sure how achievable that is, but I'll give it a go!

What about you? Do you have any resolutions for the year ahead?

Monday, 5 November 2012

Three Little Monsters

Well, I tried!

Here is my best effort of a photo of the three girls in their 'little monster' costumes. Charlotte doesn't like wearing the headband (she is the same with clips at the moment), and Lucinda seems transfixed by her claws.


Here is another shot, with Lucinda looking better, but Charlotte between smiles and Grace flashing her trademark eyes-closed grin.


Finally, here are two photos of my littlest monster, looking very cute and cuddly.


Call me biased, but these three girls would look good no matter what they wore!

Wednesday, 31 October 2012

Last Minute Halloween Costumes

No, I don't celebrate Halloween.

I'm horrified by all the merchandise I've seen in the shops recently.

Skulls, spiders, witches, and ghosts can be scary for small children, and difficult to explain.

I try to focus on the pumpkins!

I received an email yesterday from the early learning centre that Grace and Charlotte attend, reminding me to send them in costume today for Halloween. I mentioned it to Neil (who usually drops them off and collects them).

"Oh yeah," he said, "I forgot to tell you about that."

Great!

I asked Grace about it. "I want to be a monster," she said.

About 10:00 pm last night, after our dinner guest had left, I googled "last minute children's Halloween costumes" and found some wonderful ideas for dressing up as a butterfly, octopus, ladybird and the like. But the email said "scary costume".

Neil and I discussed it, and decided the whole scary Halloween scene isn't really something we want to encourage, so we decided not to worry about costumes. I did something else, then went to bed.

This morning, Grace greeted me as usual. "Get up Mummy, it's light!"

Closely followed by, "I want to be a monster. Will you make me a costume?"

She and Charlotte went off happily with Neil, after I had assured her I would work on a costume. I threw on some clothes, and Lucinda and I set off for the shops.

An hour and a half later, we arrived home loaded with supplies. Cheap nighties and leggings from Kmart, and fleece, felt, and other craft supplies from Spotlight.

The raw materials.

I found some good girl/bad girl headbands in the party section at Spotlight.  With a little effort I managed to transform them into googly eyes and horns for the little monsters-to-be.

Wrapping the headband in pink chenille sticks and securing with glue.

Cutting out felt eye pieces from a template I made.

Stuffing little felt horns with filling from a dead cushion insert.

One of the finished headpieces.

My trusty sidekick found it all a little boring.

"I was watching, Mum, but I'm sleepy now."

I hand sewed a piece of fleece to the front of each nightie for the monster's chest, and little felt claws to the bottom of the leggings.

'Claws' at the bottom of the leggings.

I sewed other claws onto little strips of fleece, that could be tied around each girl's wrists for the paws.

It's not bunting, it's claws!

I worked at it most of the day, and only stopped for some appointments this afternoon. I completed the last few stitches in the carpark outside the early learning centre late in the day, but managed to take the full costume in for Grace when we picked her up.

The complete 'little monster' costume.

She got to show her teachers, but I wasn't too fussed that she didn't get to wear it earlier in the day. She may have been too shy to do so anyway. For her, the excitement was in putting the costume on at home later, and it was all the reward I needed to see how happy she was with it.

One very happy 'little monster'!

I made an identical costume for Charlotte, in case she felt left out when Grace got hers. Unfortunately it was a bit late in the day for her though, and she wasn't really in the mood for photos.

"I'm too tired for this, Mum."

Tonight I made one more costume, this time for Lucinda. I had bought a singlet a few sizes too big to sew the fleece onto, and treated the leggings the same way as the others. Instead of a headband, she has a beanie with little horns and one big monster eye.

Felt horns and eye sewn onto a little beanie for Lucinda.

Lucinda's finished costume.

I've never made any costumes before, but I was pleased with my efforts. For less than $50 we have three more dress-up outfits, and I have plenty of fleece and other supplies left over for other projects.

Maybe tomorrow I'll try for a photo of all three 'little monsters' together. Wish me luck!

Monday, 10 September 2012

My First Quilt

For a few weeks now I've been working on a quilt to give my new little nephew when he arrives later this month.

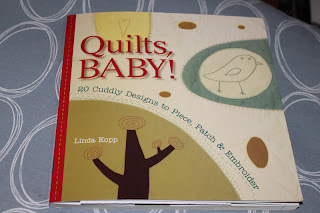
I know that someone with three children under the age of four doesn't have a lot of time for things like quilting! But I found an excellent book full of small, simple quilts designed for babies. I chose a design based around applique, which is familiar to me, and decided to give it a go.

'Quilts Baby!', by Linda Kopp (2009), Lark Books.

Neil kindly helped to draw the pattern to scale, and Lucinda accompanied me to Spotlight to deliberate over fabrics. Then, in the evenings when the girls were all asleep, I got to work.

Piecing one of the back panels.

I haven't invested in all the necessary equipment, like cutting mats and a rotary cutter. My pieces were cut with scissors, and I decided to embrace the resultant imperfections as the sign of a truly unique, handmade item.

Basting the layers together ready for quilting.

I got the applique done, and even though the machine stitching didn't look exactly as I had anticipated, I forged ahead with basting the layers together ready for quilting.

And then, disaster struck.

Some of the faulty stitches.

After doing about a quarter of the quilting, I examined the underside of the quilt more closely and discovered there is a problem with the tension. The stitches look fine for awhile, then there is a loose loop of cotton before the normal stitches resume. It isn't an isolated incident, but has happened all the way along.

I took the machine in to the repair centre, where they confirmed there seems to be a problem with its internal timing and tension mechanisms. They can send it off to be serviced, at a cost of $119 plus parts. But given that it is 24 years old, it is probably approaching the end of its life span. However, a new machine costs about $500, and we haven't got that sort of money at the moment.

A walking foot might help with the tension, but it is hard to know if it will fix the problem.

So my first quilt is currently on hold. I'll start the task of delicately unpicking the faulty stitching while deciding what to do next.

But don't worry. I don't intend to let this remain a UFO (unfinished object) for long!

Sunday, 3 June 2012

Bags for the Big Sisters

I want to be able to give Grace and Charlotte each a little gift when their new baby sister is born, to mark the occasion for them.

When Charlotte was born, Grace received a Baby Bjorn doll with clothes, nappies and a bottle.

This time, I have collected two books each (about being a big sister, or having a little sister), a soft newborn baby doll with a wrap for Charlotte, and a little Sylvanian family baby with cot, high chair and pram for Grace.

I'm not sure where the idea came from, but I decided to make them each a bag to hold their gifts.

I bought plain calico bags from Spotlight, and appliqued their names on. This is how they turned out:


I'm pretty pleased with that. The girls might be a big young to appreciate it all, but at least I can feel like I've made something nice for them.

Monday, 5 March 2012

Awesome Yackandandah

How cool is Yackandandah?

I had never been to this historic little town before, but we visited on Sunday to browse the shops and have some lunch, and I was really impressed. A cute historic streetscape, fascinating antique and vintage shops, and a great community feel.

Neil and Charlotte taking a walk down the main street.

Obviously there are at least a few locals who are into crafting, too!

Someone had taken the time to crochet colourful woollen covers for a few of the guard rails/bike racks along the main street:

Grace posing in front of one of the covers.

Detail from another cover.

Several shops were decorated with bunting, either made from colourful fabric, or (what I thought was a great idea to copy) ladies hankies:

Bunting made from hankies (I have quite a collection of those!).

More colourful decoration.

At one shop Grace made friends with the owner's little girl, Charlie, and the two of them sat at a table drawing and talking for a long time. When we finally dragged her away, Grace had a picture to take home and lots of happy memories. Meanwhile I enjoyed browsing the vintage and retro items, many of which I recognised from my childhood, or my mother-in-law's home!

My favourite window display.

I really enjoyed the hour or two we spent in Yackandandah, and would definitely recommend a visit.

Wednesday, 18 January 2012

6 Days of Creation Posters

This year I volunteered to help decorate the room the girls attend at Sabbath School. I'm not quite sure why I did that at such a busy time in my life, but it was fun!

The theme for this quarter is creation. I've finally finished the last of six posters I've been making depicting the six days of creation. All but the last one are already up on the wall at the Beginners Sabbath School at church. I drew all the outlines freehand, and I'm not a brilliant artist but was quite pleased with the results.

Here they are ...


I'll try to post a picture of them all on the wall (and the rest of the room decor) sometime soon.